I had some time to play and just had to try out this beautiful solar paste on a dark background!
2025 Christmas Card Count: 50 + 4 = 54

All You Need Is Love In The Kootenays

I had some time to play and just had to try out this beautiful solar paste on a dark background!
2025 Christmas Card Count: 50 + 4 = 54

I am wanting to get better at using my water brush, so when I pulled out these sports balls to colour up, I decided to use it with my Tombow markers.

I have been wanting to try out some ink smooshing with acetate and distress inks so I took the opportunity to try it to make up some sympathy cards.

It's my day to post on the Studio Katia Blog! I wanted to continue to work on my Christmas stash, so I took out the Snowflake Shaker die from Studio Katia. I cut out three snowflakes in some kraft heavystock and spritzed them with some phantom mist distress mica spray. I also sprayed a kraft card base with the same colour and then added some white paint spatters and set aside to dry.

Good morning! I'm up on the Studio Katia Blog today sharing my Birthday Balloons Shaker Pocket Card. I started out by creating a base for my card using the Mini Slimline: Small Hearts Cover. I used some low tack tape to cover up the pierced detail around the cards so that I could maintain a clean white border. Next, I took out the Birthday Balloons Duo Stencil and inked up the first stencil with some Lost Shadow distress oxide ink using a blending brush. For the second stencil in the Birthday Balloons Duo Stencil set, I mixed some sparkle glitter with some black texture paste. Using a palette knife, I spread this mixture over the stencil. I removed the stencil to let the paste dry.

Good morning! I am up on the Studio Katia Blog today sharing how I used Black Texture Paste on the beautiful Mandala Stencil from Studio Katia to create two cards.

Good morning! I am up on the Studio Katia Blog today sharing my card featuring a recessed Darling Freesia. I wanted a simple design to feature this beautiful floral image and played around with my dies to achieve it. I started off with a watercolour card base and another white panel that was 4 1/4 x 5 1/2. I took that panel and used the rounded rectangle die from the Dotted Patterns - Set 3. I took out the Darling Freesia coordinating die and used it in the middle of that panel.
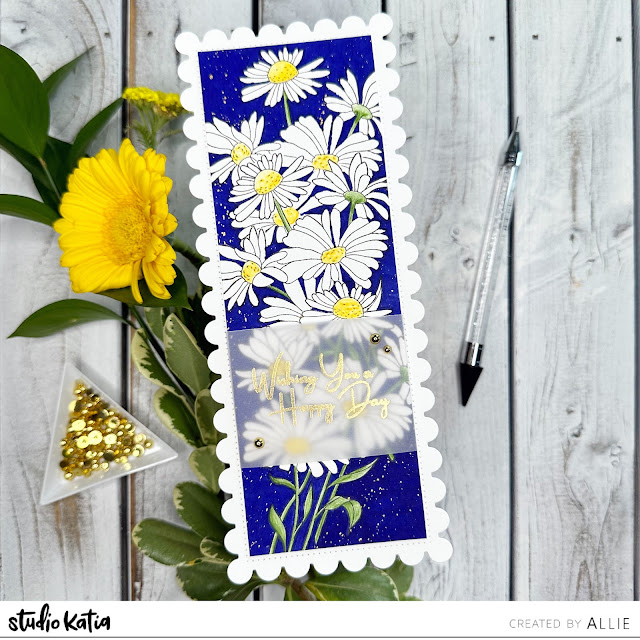
I am up on the Studio Katia Blog this morning sharing a birthday card featuring the Daisy Bunch stamp set. I have so many daisies around my place right now that I just had to take this set out! I took out Dotted Slimline Set 3 and cut out two scalloped backgrounds in white cardstock. I took one of them and cut off the scallops along the dotted lines and set aside the one still in tack to use later. I stamped the daisies at the bottom of the panel in black ink and added a mask on top so that I could stamp another daisy bunch above. I added another mask on top and stamped a third daisy bunch at the top of the panel. I removed the masks and set them aside for later.
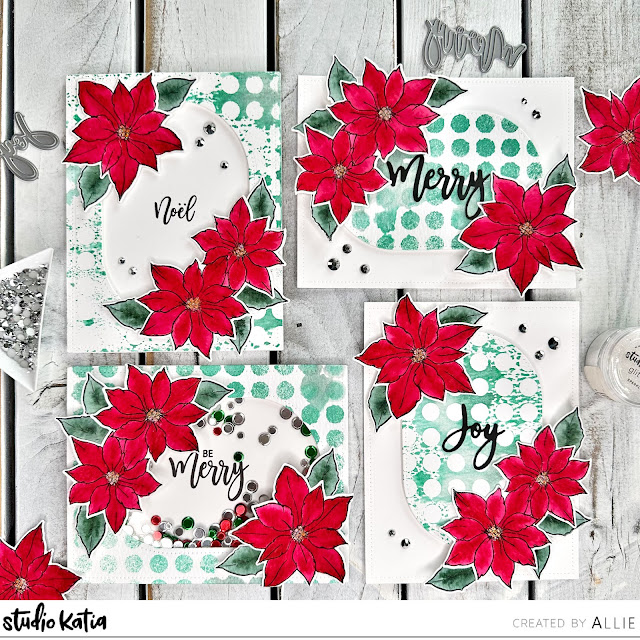
Good morning! I am up on the Studio Katia Blog this morning getting a jump start on my Christmas card stash. With all of the Christmas in July inspiration out this month, I decided to take out one of my favourite Studio Katia Christmas sets: Merry Poinsettia. I tried out the following technique so that I could make four coordinating cards all at once.

Here is another slimline card I made while I was trying out the ghost embossing technique! I cut out a background using the Dotted Slimline Set 1 base in kraft cardstock.

I am up on the Studio Katia Blog today featuring a new technique I wanted to try: ghost embossing! The name sounded interesting so I just had to check it out. I started out with the Dotted Slimline - Set Two large stitched rectangle and cut it out in some kraft cardstock. Next, I took out the Sunshine of Hope sunflower and started in the middle of the card. I inked up the sunflower with Vintage Photo distress ink and stamped the image twice. Then, I shifted the slimline panel over to the right and down ever so slightly. Next, I inked up the sunflower with some white pigment ink. I stamped the image 3 times. This produces the 'ghost embossing' effect by giving the illusion that the sunflower has been embossed!
*TIP* the amount you want to shift your panel to achieve this effect really depends on the thickness of the image you are using; the lines of this sunflower are not very thick, so I did not shift it very much!

Today I am over on the Studio Katia Blog sharing my latest project: a Spring Roses watercolour card + matching tag! I took out the Spring Roses stamp set and stamped the roses in a clear pigment ink on a piece of watercolour cardstock that was 4 1/8 x 5 1/2. I sprinkled some gold embossing powder over the image and heat embossed it. Next, I took out the Simple Dotted Borders and used the straight dotted line over the left edge of my watercolour panel to give some interest.
*TIP* The Simple Dotted Borders single line of dots does not cut your panel, it only imprints the dots.

Not my typical colour palette using Spiced Marmalade + Lumberjack Plaid + Prize Ribbon distress oxide inks, but when a little guy tells you those are his favourite colours, you try to make them work!

Today I am over on the Studio Katia Blog sharing a quick birthday name shaker card! My son needed some birthday cards for a birthday party for twins in his class. First, I took out the Black on White Paper Set and die cut a background using the Mini Slimline: Small Hearts Cover. Next, using the Chunky Alphabet, I die cut each of the names out of white cardstock.
*TIP* save the negative cardstock from the die cut letters to hold the letters for easy ink blending

I put together a birthday card for one of our friends this week and couldn't help but try to make it into a shaker card - I'm a bit obsessed! I took out the Beer Blueprint stamp set from Tim Holtz x Stampers Anonymous and stamped it onto Distress Watercolour cardstock. Next, I took my exacto knife and cut around the inside of the beer mug.

I am up on the Studio Katia Blog today with my first shaker card project! I am fairly new to the world of shaker cards and let me tell you, Studio Katia is the perfect spot to get all of your shaker card needs! With Mother's Day coming up soon, I wanted to make some personalized cards for both my Mom and my Mother-in-Law. What do you call your grandmother? Grandma? Nana? Nonna? Gigi? Oma? This written tutorial will detail how I made the 'Grandma' card and my YouTube video tutorial will show how I made the 'Nana' card. Supplies for both cards are listed and linked below.

I am up on the Studio Katia Blog today with a new project! To start off Earth week, I thought it would be fitting to showcase a zero waste card using plantable paper! This biodegradable paper is made in Canada using post-consumer paper waste and embedded with wildflower seeds. Because this card can be planted, I wanted to keep it one layer and not use any adhesives or embellishments. I took out the Gladiolus stamp set and stamped it in the middle of my card with black ink using my stamping platform. Next, I created a mask on a piece of 4 1/4 x 5 1/2 masking paper by stamping the flowers in the same spot using my stamping platform. I cut this mask out and saved the negative. I trimmed off the stems but kept them to use.

Here's another Easter card I made up using the same technique as the card I shared on the Studio Katia Blog this past week. I was searching some of #kristinasoxidecombos by Kristina Werner and came across this colour combo! Here's a picture of my trusty little shadow helping me with my photo :).

Happy Easter! Here are the cards I put together to give to family this Easter weekend.

I am beyond EXCITED to announce that I am a Design Team Member for Studio Katia! I have been using this Canadian company's amazing products for years and I am thrilled to be a part of the team. For my first project, I just had to pull out the daisies from the Daisy Bunch stamp set. First, I stamped the daisies onto a piece of white cardstock using a black archival ink using my stamping platform. I left the stamp setup so that I could come back to it later. I then diecut that panel using the dotted rectangle from Dotted Patterns Set 1.